Wednesday, February 27, 2013

Daily life in photos...


The Christmas decorations are finally coming down. At least we got in before Easter. Not like one year where we just put the tree away fully decorated... #lovejc

Tuesday, February 26, 2013

Family Organisation App - Cozi

I discovered this app by Cozi when I was looking for a list that would sync between my phone and my husbands. You know those times you just happen to be at the shops so you think, I may as well pick up a few things that we need. Except your paper shopping list is sitting at home on the bench. So you try to remember, but forget 3 things and have to go back again the next day.

And now that The Bubs is here, its my husband who tends to be out and about more for those incidental shopping trips, and funnily enough he's less likely to notice the things we are getting low on, like breast pads for example. :)

So I thought if we could have a synced list on our phones, then no matter who put things on the shopping list and who ended up at the shops, we'd always know what to get.

What I found was even better than just a shopping list. Cozi is a family organiser complete with shopping lists, to do lists, calendar and even a journal. You can create multiple users in the one account so you can assign things to different family members and it all syncs across devices.


Best of all it is free! There's yearly paid subscription upgrade for a few extended features, but the free version is very useable.

Its available on Apple and Android, and you can also access it on their website which  is perfect. Overall this is a brilliant app for families. Provided you can train them all to use it - I have to remind my husband to put things on the calendar.

The good thing is, though, that even if they don't remember to look at it, you can set up reminder emails (and texts  for US users) to send to the relevant family members, or device notifications.

I love this app! I'm not paid or affiliated with Cozi in any way I just love the merge of technology and organisation, and thought others might too :)


Monday, February 25, 2013

Road testing healthy chocolate cupcake recipe


I was so excited to come across all the recipes on The Healthy Chef and couldn't wait to try some out. But when I actually went shopping for the ingredients, I realised how expensive this venture could be. Most of the cakes call for almond meal, which in the required quantity was far too much money. The chocolate cupcakes Im testing below would have cost about $12 just for the almond meal alone. The website names coconut flour as an alternative to almond meal for those with nut allergies, but I'm not sure you can even get that in my little town, and I can't imagine it being much cheaper.

So I decided to experiment with some substitutions of my own. I already had LSA at home, which is ground linseed (flaxseed), almond meal and sunflower seeds. Since that already contains almond meal, and I had read about using flaxseed, I thought I'd give it a go.

There were two recipes I wanted to try - a chocolate cupcake and a lemon cupcake - but I thought I'd go with the chocolate first as it looked harder to stuff up.

The recipe for these chocolate cupcakes is here on The Healthy Chef.

My changes:
- I substituted equal measure of LSA for the almond meal.
- I also added an extra tablespoon of honey, after I tasted the mixture and thought it was a bit too lacking in sweetness.
- I was using vanilla essence, not extract or paste, so I added a fair bit of that since essence is not as strong.
- I used unsweetened almond milk.
- I used regular Cadbury cocoa powder.
- I used olive oil - basically because that's what I had.


The mix looked chocolatey... But if you gave a spoonful of this to a child they'd probably make a face...

The mix was a funny, airy, puffy consistency, not smooth like if you were making regular chocolate cupcakes. I think it's because of the flaxseed soaking up moisture and going gluggy. Because of that I wouldn't leave the mixture sitting too long before baking. But even with having to go settle a crying baby twice during this process it was fine, so it's not a big deal.

They took exactly 25 minutes as the recipe said. They definitely smelled like chocolate in the oven.


The downsides?
If you tell someone you're giving them a chocolate cupcake and give them this without warning, they'll probably throw it at you yelling 'liar!'

Ok, maybe not that extreme, but these are definitely not sweet. It's like the difference between really dark chocolate and milk chocolate. If you're used to dark chocolate, or prepare yourself for it, you should like these.

If your new in your sugar free healthy eating journey, then you may struggle to acclimatise your taste buds at first. I would recommend eating them with some puréed or smashed up berries on top to give some sweetness. I think they'd be really yummy like that.

The Upsides?
They are quick and easy.

These are actually healthy - the protein and good fats from the nuts and linseed, and the absence of refined flours and sugars mean that the nutritional values justify the calories. And if you use good quality dark cocoa or raw cacao then you are getting a whack of antioxidants as well.

So if you can retrain your taste buds, then this is a chocolatey fix you can enjoy and know you're not harming your health - in fact our doing yourself some good. (As long as your not eating the whole lot at once obviously.) They are also more substantial - you feel like you've eaten something.

And these are also gluten and lactose free.

Bottom line: Success!!
So you can use LSA in place of almond meal for these cupcakes. They cooked well and have a nice moist consistency.

They aren't super sweet, but you can't expect a healthy sugar free cupcake to be just like a sugar, white flour version. And the point is to retrain your taste buds anyway.

Serving suggestion: Eat warm with smashed berries over the top.


If you try these or any other recipes, please share!
Happy healthy baking.


Thursday, February 21, 2013

Great Source for Healthy Recipes


My husband and I are a just over a week in to a 100 day sugar free challenge. He's been challenged by his dad, and gets monetary gain to spur him on. I'm motivated by the promise of a robotic vacuum cleaner at the end of it... :)

Going well so far. I've even been to a birthday party, and stood fast while everyone else hoed into a delicious looking blueberry and white chocolate cake.

Then last night, while everyone else was tucking into pieces of chocolate cake, I realised I was imagining eating that sugar laden packet cake and actually cringing. I didn't want it.

I've been hunting for sugar free recipes, but I didn't just want to replace added sugar with just as much of another sweetener. Even though it might be healthier to use stevia instead of refined sugar, if everything else in the recipe is the same and it still tastes just as sweet then I'm not really retraining myself. I'll still crave sugar and sweetness. Especially if it's made with white flour.

What I really want to do is retrain my taste buds so I no longer need things to be as sweet. And so I no longer want to eat sickly, sugary, refined foods. Who wants to rely on their will power all the time? Mine fails me more often that it helps me. It's a fickle companion at best. But when has anyone ever needed will power to NOT eat brussel sprouts. I mean, that one comes naturally. If you don't like it, it's pretty easy to not want to eat it.

I believe it can be the same with healthy eating. We can train ourselves to like less sugar, less refined, processed food. We have to learn not to cringe at words like 'wholemeal' and 'sugar free', and stop only thinking of health foods as yucky, bland vegetables. The truth is even brussel sprouts can taste amazing if done right. We just have to know how.

So I was thrilled when I came across The Healthy Chef.

I haven't actually tried any of the recipes yet since it's 9pm, but I want to get right on it tomorrow. And I'm hoping they turn out well and satisfy the desire for yummy snacks and baked goods without the sickly sweetness.

A lot of the recipes are already wheat free, or have variations or adaptations to make it gluten free, or suitable for paleo diet etc.

Easter is coming up - I wonder if these wholemeal, gluten free, no sugar Hot Cross Buns will hit the spot?

I'll keep you posted on my experiments.

Happy healthy baking, and if you have tried any of these recipes, or any other sugar free recipes that have turned out well, please share!!


Wednesday, February 13, 2013

Zucchini & ricotta pita bread pizza


With peas... Weird you say? Don't knock it till you try it!

(Although I did grow up with things like peas, corn and carrot on my pita bread pizzas so maybe my taste buds have grown accustomed.)

But you can put whatever veges and healthy toppings you like on this healthy, low calorie homemade pizza.

The basics of this pizza are a small wholemeal pita, tomato paste and ricotta cheese. Ricotta has significantly fewer calories than many other cheeses.

Then what topping you add is up to you. The trick is to load it up with tasty veges and flavours and go easy on the calorie rich, fatty things like meats and mozzarella cheese.

My pizza was:

- 1 pita pocket

- spread with approx:
1 Tbsp tomato paste
2-3 Tbsp tinned diced tomato
1 Tbsp ricotta cheese (low fat even better.)
1 tsp of Dijon mustard for a bit of bite

- add:
3 thin slices of pepperoni, quartered and spread evenly
4-6 thinish slices of zucchini
1 tbsp frozen peas

- sprinkle with:
Pinch of paprika
A tiny bit of grated cheddar, mozzarella or parmesan if you can't bare to skip it completely.


Works out to about 300-350 calories per pizza and can be low fat depending on your ingredients. Load it up with even more veges for an extra filling low cal meal.


Tuesday, February 12, 2013

Things to do for new parents

new parents, new mum, new mom, new dad

I cant help but think that bringing home a new baby would have been easier in a time when we lived in smaller villages with bigger families. These days we can keep in touch with our 'community' and families through Facebook, but Facebook cant make you a cup of tea, fold your laundry or hold the baby while you have a shower.

We're used to these modern times I think - most of us wouldn't want to give that up to have our whole extended family move in with us - but at times like when new parents bring home their baby, we shouldn't neglect to recreate a bit of that village feel.

Parents don't always know what to ask for even if you offer, and don't want to feel like a burden, so if you know any new or soon-to-be parents here are a few suggestions of practical and specific offers of help you can make.

(Mainly aimed at first time parents, but many still apply no matter how many times they've done it before.)

For both:
- Clean the house before they get home from hospital. A freshly made bed or freshly scrubbed bathroom will feel like luxury.


- Stock the fridge and pantry with meals and/or easy to use groceries.


- Bring food whenever you visit - either stuff for the pantry, or freezable meals. Or just something as simple as a plate of biscuits. Coming soon-  ideas on the best freezable, nutritious food to make for new mums.


- Leave the house a little cleaner than you found it. It shouldn't be hard to find something to do. Fold laundry, dishes, sweep the floor. And if you are there around a meal time don't leave the mess for the parents to deal with when you leave.


- Hire a cleaner - sometimes parents may feel embarrassed to have you come and clean their toilet, so consider paying for a cleaning service to come a few times in those early weeks or months. Even better, check which day will work for the parents, then ring, book and pay so its all taken care of.

- Lend them your DVDs. New parents probably wont get out as much, and breastfeeding mums especially will be spending a lot of time sitting around. TV series are great because you're not committing to 2 hours, but movies can be paused, so give 'em everything you've got. (Keep your own record of what you've leant them incase their sleep deprive brains can't keep track.

For mum:
- Beauty services. She probably can't get to a salon very easily at first. The merry go round of feeding and sleeping doesn't leave much time for scheduled appointments. And she probably barely has time to shower regularly. So come round and offer to pamper her a little. These are things you could do even while she's breastfeeding. Eg pluck eye brows, wax legs, mani pedi, moisturise, facial, even just brush her hair. 


- Stock the shower with yummy bath and body products. Showers will be irregular and rushed for a while, so make them special.


- Get her out of the house - sensitively of course. Mum may just want to sleep, or lie on the couch with a cup of tea, but if she's happy to, encourage her to get outside and go for a walk together while you're visiting rather than just sitting on the couch. Mums will benefit from the fresh air and exercise, but sometimes just getting out the front door can seem like too much trouble without a friendly push and a helping hand.

- Tell her she looks great. Admire how well she's bouncing back. Be sincere of course, because an obvious lie will make her feel worse. But its a great little boost to think maybe you don't look as horrible as you thought post baby.

- Buy her some e-books. Check what format she has the gadget to read them on of course. Paper books are harder to manage one handed.

For dad:- Give him some love - dads often get left out when it comes to the care, concern and credit. Everyone goos over the baby and fusses over mum - and rightly so - but dads are experiencing emotions and changes and stress and tiredness too. Plus they often have to pick up slack around the house, emotionally support their partner, learn the ins and outs of newborn care without the 9 months of bonding, mental prep and motherly instinct - all while often still going to work. And then they get ignored. 


So bring a beer, clean the BBQ, mow the lawn, tell him you admire him. All in a totally manly way of course.

- Praise him when he does something well with the baby - and don't act surprised. Act like you knew he would be a natural parent all along.


Hope that helps give you some ideas that new parents will love you for! Any other great ideas for things you've done for new parents, or things others have done for you? Share below!


Tuesday, September 25, 2012

Berry & cream cheese topping for pancakes


I love cream cheese. I could eat cream cheese icing by the bowlful. And berries and cream cheese on pancakes is a delicious classic.

I've seen topping recipes with cream cheese and whipped cream but I didn't have any cream - what I did have was ice cream, so I thought, why not?

This topping is easy and yummy. All you need...

Cream cheese
Vanilla ice cream
Icing sugar
Berries - fresh or frozen


While the pancakes were cooking, I put about 5 heaped tablespoons of cream cheese, a scoop of ice cream and a 1/4 to 1/3 cup of icing sugar. (Super accurate measurements I know... Just taste and rejigger how you like.) This made enough for several people/servings.

Top your pancakes with the berries, cream cheese mix & a squeeze of maple syrup if you want. Yum.

This topping is not as light and fluffy as if you used whipped cream, but its creamy and sweet and tastes like cream cheese... That does it for me!

Now for a what not to do:
I'd just started the dishwasher before realising our one and only fry pan was in there. So to cook the pancakes I thought I'd try using the sandwich press.... Not a disaster by any means, but not really a great success. It works in a pinch, but doesn't really get hot enough to work well.


Update: I froze the leftover cream cheese mix and then just scooped it out still frozen on my pancakes the next day. Mmm mmm.


Monday, September 24, 2012

Simple, Lazy Grocery Shopping Tips

I like grocery shopping - I like pretty much any shopping, so the supermarket is no exception.

But I can be kind of lazy about it. And I can just about count on one hand the number of times I've actually left the store without forgetting something. So while I like to wander the aisles, by the end when I've had to wander each aisle twice because of my disorganised shopping list, and then I leave with things I didn't come for and without things I did come for, I think...there's got to be a better way to do this.

I know you're meant to write a list and only buy what you wrote on it, but that doesn't work for me for two reasons.

1. I forget to write things on it. If I only stuck to the list we'd have to go without toilet paper or cheese one week, because I didn't think of it til I was at the supermarket.

2. What I buy is often dependent on what's on special. I might be thinking beef, but if the chicken is on special today, I'll probably stock up on that instead. And my husband often teases me about the time I bought about 15 cans of tinned tomato on special - but now we're out of it and need more and it's not on special, so I'm justified! I should have bought more!

So...


1. Tip Number One: 'Print a permanent' shopping list.


Keep it on your fridge or on the bench, then every time you notice you're out of something, just tick it or circle it on the list.

Why is this better than just jotting down a list on a piece of paper like normal folk, you ask?

I like this system for a few reasons:

1. It's pre-organised - no matter what order you think of the stuff you need, it's already organised into categories for you - or even aisles if you are super organised and shop mostly at the same supermarket. No more getting the honey and then realising 6 items down the list you have to go back for the peanut butter.

2. It's a memory jogger - even if you forgot to tick something on the list, it's still written on there and might help you think of that item once you are actually in the supermarket.

3. It's got all your usual items, so if something is on special, even if you didn't go planning to buy it, you are reminded that it could be a good idea to stock up.

(We don't have the same system in Australia, but if you're in the US or somewhere where you use coupons, you could also put mark next to the items you have a coupon for.)

You can download and print a free copy of mine HERE if you want, but basically it's a printed list of all the things you most often buy, organised into sections, with little check boxes next to them. I suggest making your own personalised version so it's got the things you buy on it and in the order that works for you and your supermarket.

I just did it in a word processor, by creating a text box with columns. I added the check boxes by setting the square as the bullet point. (As well as the items, I also left lines for writing on extra stuff that is not as common, and leave enough space around so that you can write quantities or brands for certain items.)


2. Tip Number two: Put 2 things back.

If you're at all like me, even with an organised list, you probably buy more than you actually need. Especially if you're feeling even slightly peckish.

So just recently I've started putting at least 2 things back before I go through the checkout. That box of biscuits that I don't really need? The packets of chips you bought because the special price made them seem like such a good deal? Put them back and save $5 - and 5 million calories. You might wish for a few minutes that you'd kept it in, but later you'll be thanking yourself.

If you're really bad with this, maybe even start with putting more things back with the aim of training yourself out of it. My aim is, for most shopping expeditions, to eventually look in my trolley and not find anything I can take out.

Putting things back right at the end is somehow easier than not getting them off the shelf in the first place. I think because you don't have time to change your mind, whereas if you walk past the chips and don't grab them you have too much time to think about them and go back and get them later as you walk past that enticing end of aisle display.


So they are my two simple tips for easier, lazier - but organised - grocery shopping?


Got any more tips? Comment below!

Happy shopping!


Friday, September 14, 2012

Stained by Sharpie Fabric Markers


I found these for only $15 in Big W the other day and had read about them, so thought I'd give them a shot. They have a 'brush tip' so the end is very fine - I was able to write words quite small and neatly - but if you press a bit harder you can get thicker lines.

It's definitely an ink, not a paint. I was imagining it as being more opaque and thick as if I was using a fabric paint, but it's not like that. It's the same effect as if you put ball point ink on fabric - although it is much smoother and easy to use than a ball point pen of course.

I think it will take a bit of practise to get really good and creating designs and using the markers effectively to get smooth lines etc, but they are easy enough to use that you can get right to something that looks half decent.

You need to pull the fabric slightly taut to make it easier, and not press too hard with the marker - if the fabric bunches up you end up leaving the marker on the fabric too long and it pools a little, meaning you get a little uneven splotch. This didn't happen too often though, and I wasn't trying that hard to keep my fabric flat.

For some reason the purple marker was far more prone to splotching than any of the other colours. I don't know why that is.

I also tried out painting the marker ink on to the surface of a stamp and stamping the fabric, which worked too. That would be an easy way to create words and designs if you weren't confident with hand drawing right away.

I think the colours could be slightly better - for example the yellow is a bit too fluorescent for my liking - it doesn't always suit the other colours you're using when one is fluoro and the others aren't. The pink was also slightly fluorescent too.

But over all I was happy with them, and the brush tip design definitely works. You'd need to make sure you look after them, though, so the tips don't get squashed. I.e. I wouldn't let kids use them. For that I'd get the cheaper Crayola brand.

I've only tried it the baby's T-shirt in the picture so far, and even though that is a stretchy fabric, it worked well, so I can't imagine having much trouble on most surfaces.


Thursday, September 13, 2012

My Favourite Vanilla Cleaning Spray: Perfume for your kitchen!

safe4u vanilla fridge and kitchen wipe
This is my favourite ever cleaning product. It's basically just alcohol and vanilla in a bottle. It's totally safe, and smells amazing! I love it for wiping down my benches or cleaning the fridge, and though it's designed for the kitchen I sometimes use it in the bathrooms too, just because of the scent.

You can't always find it in every supermarket, and if they have it, it always seems to be on the very bottom shelf. My mum used to use this when I was a kid, back when it was called Vanilla Fridge Wipe. I was unnaturally happy when I found it again as an adult :)

It's made in Australia and as far as I know, only sold here, so I don't know if you can get an equivalent product elsewhere.

Nobody is paying me to say this, I just love this product! (Though I wouldn't object to a lifetime supply of the stuff.... :)


Tuesday, September 11, 2012

Easy, Versatile Pumpkin Salad


I sometimes buy pumpkin but then end up not knowing what to do with it, so it goes bad in the bottom of the fridge while I'm still pondering. There's roast pumpkin and pumpkin soup of course, but the former is a little boring and the latter is too much effort when you want tea on the table in 20 minutes. Plus, sometimes it's either too hot for soup, or if it's winter you've already eaten soup 7 times this week and want something different. (In Australia we don't put pumpkin in everything this time of year like I might if I were in the US, and it's coming up to summer, so I'm probably limited in my pumpkin recipe repertoire!)

So here's a super easy pumpkin salad to try out. You can make it as fancy or simple as you like. At a minimum you need:

- pumpkin
- lettuce/rocket/baby spinach - any of these or some combination
- cucumber
- pine nuts/slivered almonds/chopped peanuts/chopped walnuts or pecans - any one of these works
- olive oil
- lemon juice
- salt and pepper

Extras: If you have them, you can also use
- paprika
- sweet chilli sauce and/or powdered/flaked or fresh chopped chilli if you like the heat
- balsamic vinegar
- honey
- feta
- cherry tomatoes
- pasta, if you want to make it more of a pasta salad

Note: I don't really use measurements for things, sorry! I generally just eyeball it based on how many people I want it to serve and taste it as I go.

How to make it:
1. Chop the pumpkin into bite size pieces - You want enough for about a handful of pumpkin pieces per person.
2. In a bowl coat the pumpkin in a little olive oil + salt and pepper. Also add sprinkling of paprika if you're using it, and/or a drizzle of honey or sweet chilli sauce and/or chilli powder/flakes according to taste. (If you don't want to add chilli at this stage, you can add fresh chopped chilli when you assemble the salad at the end. Or you can add chilli at both stages if you want!)
3. Spread the pumpkin on a tray and roast in the oven. About 180 degrees celsius. Only takes about 20 minutes, depending on the size of your pieces.
If you want your pumpkin still warm when you serve your salad, do the next steps now. Otherwise you can wait til the pumpkin is out of the oven and cooling to assemble the rest.
4. Chop cucumber and chop or rip your lettuce/baby spinach etc. into chunky bite size pieces. Put in a salad bowl. (You want a reasonable amount of these fresh salad ingredients - the pumpkin can get too much if you don't have the freshness to cut through it.)
5. Sprinkle over your choice of nuts. You can toast these first if you like, by frying for a couple of minutes in a frypan sprayed with oil. Pine nuts or almonds are especially good toasted.
6. Chop and add a bit of feta and or cherry tomatoes if you're using them. If you're adding fresh chilli you can add it now too.
7. Once the pumpkin is out of the oven and cooled slightly (or completely if you want it cold), add to the salad.
8. Just before serving (so it doesn't go soggy), toss the salad together with a drizzle of olive oil, and a splash of lemon juice. Add a little balsamic vinegar if you're using it, too. (Go easy on all these dressing ingredients - add a little at a time. You can always add more but you can't take it out again.)

Season with salt and pepper and serve.

(If you want to make it a pasta salad, cook your pasta and add it either cold or warm at the end just before serving. You might want to reduce the amount of lettuce/spinach you add.)


If you make this or have your own variation, I'd love to hear how yours turns out and what you put in!


Monday, September 10, 2012

DIY Cork Board Painting


painted cork pin boards

Super easy and super cheap art work & practical pin up boards.

It's really easy to paint your own cork boards for decoration, use as a pin up board or even as placemats and coasters.

All you need are some cork shapes, paint and tape. (Optional - white primer. You could probably just use white paint if you don't have primer.) Only takes a couple of hours including paint drying time. Probably just 20 minutes of actual doing-something time, and you can go away and do something else while the paint dries.

These are heat pads from the 2 dollar shop - cost me $4 in total. From there it was essentially free since I already had the paint and the duct tape. If you have to buy the supplies, it still won't cost you that much to buy a bit of acrylic paint and some masking tape or duct tape. 


1. Tape off cork boards in varying designs.
2. Paint with a coat of primer (or white paint.) You can skip this step if you want, but the colours won't be as vibrant at the end.


3. Once the primer is dry, paint with your choice of acrylic paint.
4. Once the paint is dry, peel off the tape and there you have it.

I stuck mine up on the wall as a decorative pin up board. Although they looked too pretty to stick pins in so I ended up using some mini craft pegs stuck on with blu-tack instead of pins. 


If you wanted to make these permanent you could even glue them on to clip on notes, photos, tickets, whatever on to your boards. (Obviously the positioning is permanent then, though.)

The possibilities are endless with these DIY arty cork boards - you could do this on a full size cork board, on a combination of round and square ones, on coasters or placemats.... use different thicknesses of tape or use stencils to create decorative designs or add initials or words.

The limit is your creativity! :)

Happy cork painting!


Saturday, September 8, 2012

Easy DIY Engagement or Wedding Gift: Personalised Photo Frame


Just choose or paint a photo frame - I used a gold 8x10 frame - and jazz up the inside, personalising it for the couple you are giving it too.

In a word processing program I made my page size 8x10 (or you could just create an 8x10 sized text box).

I copied and pasted a Bible verse I liked - in this case Love is patient, love is kind etc - chose a font I liked, and then copied and pasted that repeatedly until it filled the whole page. The final "Love never fails", I cut and pasted into it's own text box and made it larger to stand out at the end.

Then I inserted a blank white shape the right size for a 6x4 photo graph, and laid that over the text.

After I printed that out, I cut out the white shape so there is a hole for the photo.

Then I chose a piece of card in a colour I wanted for the mat, and cut out a hole for the photo, slightly smaller than the hole in the printed paper, so that it creates a border. I stuck the whole printed sheet down on the cardboard, lining up the cut outs, to reinforce the whole thing, and trimmed the cardboard down to the right size.

Then I used letter stamps and red ink to stamp the couple's name over the text.

If you have a good photo of the couple, you could put it in for them, but since I didn't I just left a gap for them to choose their own photo to go in. Pop in it the frame, wrap it nicely and off you go.


The possibilities are endless with this simple engagement or wedding gift - buy, paint or decorate any sort of frame you like; choose whatever verse, poem or words you like to fill the back ground; stamp names, dates, or anything you want over the top... be creative!

A variation of this is to create an 'I love you because' message board. Follow pretty much the same process - you can still leave a space for a photo - and just have the text "I love you because" printed or stamped prominently. Then give the frame with a liquid chalk pen or dry erase marker so that the couple can write messages straight onto the glass.


Happy creating!


Download the Love is... frame mat free printable as an editable Word file. The page size is A4 for easy printing, and the text is in an 8x10 text box. Just trim to the right size after printing.

For it to show up properly, you'll also need to install the free font from here - Pea Stylist


Thursday, September 6, 2012

Chest of drawers makeover - from fugly to funky

Our first baby is on the way, and so gradually our nursery is coming together. I'm more than happy to buy second hand or repurpose furniture that we've already got, but I still don't want to compromise on the prettiness!

We have a set of wardrobes, chest of drawers and bedside tables that have lasted since my husband had them as a child - they were all still in great condition for just being your basic laminated furniture. But they were Ugly. Pale barely blue laminate paired with slightly beige drawer fronts plus chipping gold coloured plastic strips and knobs. Eeek. Not what I wanted. But I was pretty sure I could give the chest of drawers an easy, funky makeover with relatively little trouble and far far less cost than buying a new set. And I'm ecstatic with the result.

drawers before and after

No the chest of drawers did not double in size as part of the makeover. I just forgot to take a before picture of them, but the bedside tables are exactly the same so you can still see the transformation.
It's really super easy - anyone can do it.

You need:
-Primer
-Paint
-Fabric for drawers in chosen print (or coordinating prints.)
-Mod podge or similar glue
-Paint brushes
-Fabric scissors
-Drawer pulls (unless you can reuse the old ones)

-A weekend or a couple of week nights. (The actual work doesn't take more than a few hours, but you need to let the layers of primer and paint dry thoroughly.)


How I did it:
1. First I removed the old drawer pulls and the plastic strip glued to the front. Most of these peeled off easily with no residue, probably because the glue was 20 yrs old.
2. I marked which drawer went where - you'd think they'd be identical but sometimes they don't fit quite right if you put then back differently - then removed them and set them aside.
3. I cleaned the laminate of the chest of drawers but didn't sand it or anything. Make sure it's completely dry before you start painting. I applied two coats of a general purpose primer, leaving a few hours between coats. Then I left it to dry completely for about 24 hours.
I also painted the new wooden drawer pulls with primer too. (the old plastic ones were too shiny and slippery I didn't think repainting them would work too well.)
4. After the primer had time to dry, I painted on two coats of acrylic paint (on the drawer handles too.) I used the left over wall paint we had from when our house was painted, rather than buy new stuff since I just wanted plain white anyway. (or more specifically, a shade of white called Chalkdust). Same as primer, at least 2 hours between coats, and then I let the paint dry for a day or so before I moved the chest of drawers to make sure the paint was super dry and hard and not going to mark up easily.

painting laminate furniture


At some point while the paint is drying you can cover the drawers.

covering drawers in fabric


1. Lay the drawer face down on your chosen fabric and cut around. I left at least a few cm / 1inch over hang to stick down. Will depend on how thick your drawers are.

Iron the fabric.

I cut out all three pieces at the start then glued one drawer at a time.

2. Paint the drawer face with an even layer of mod podge. Doesn't need to be super thick. (make sure the glue hasn't filled up the screw holes for the drawer pulls.)

Lay your fabric down onto the drawer face. You'll have a bit of time to reposition it, so make sure the print is straight and even, then press down and smooth out. You could use a dry clean cloth, or even a credit card or piece of cardboard if your fabric is particularly wrinkly or bubbly, but I found my hands worked fined. Make sure they're clean.

3 & 4. Now use a smaller paint brush to paint the glue on the edges of the drawers and smooth the fabric down on to it. Do one edge at a time. I used my thumb to push down from the top and down over the side to get a nice sharp edge.
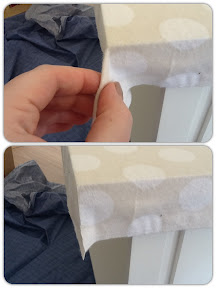
covering drawers in fabric
Corners: I tried a few different methods for sticking down the corners. Folding left too much bulk, so the best method for cutting I found was this. Once two adjoining edges are stuck down, pinch the excess fabric and then cut straight down with sharp fabric scissors. The drawer stops you trimming off too much.


5. Flip the drawer face down on a clean, protected surface (away from where your were previously gluing so no stray drops that got on that surface get on the fabric on the drawer front.)

Paint glue along the back of the drawer fronts, and stick the fabric down. You want the fabric to wrap right around like this so that you don't get any peeling or lifting that would be visible on the front. If the edges do lift at any point in the future it's all hidden. Trim a bit more at the corners if there's too much.

6. Finally I lightly mod podged the edges of the fabric so that any fraying or lifting is minimized.

Leave to dry. (I wanted the texture of the fabric to stay as it was so I didn't mod podge or put sealer over the top of it or anything. Have yet to see how the fabric will hold up in terms of marks or stains, though. I don't think it would be that hard to recover later if they get too dirty.)


One everything is totally dried, put the drawer pulls back on. I put the screw in from the back to slightly push out the fabric and then used the tip of the scissor blades to snip a little hole for the screw to emerge through. Then screw the handles on.


Voila! Pretty simple for great results! Now someday I've just got to do the same with the rest of the bedroom suite...
before and after furniture makeover


If you do any furniture makeovers, or have any more tips or tricks I'd love to see them/ hear about them!

Tuesday, September 4, 2012

My favourite cleaning cloth - 'white magic'

I don't remember where I got this from, whether I bought it or someone gave it to me, or know off the top of my head where you could get it from - I even forgot I had it until I sorted out a random box of bits that had hidden itself in the back of a cupboard.

But I love this cloth! I highly recommend it if you do find it.


It's a blue microfiber cloth that's ribbed on one side and flat on the other. The label informs me it's called White Magic.

Remembering the wonder that's google I found the company website

That should be able to lead you to where to find their stuff should you so wish.

I just cleaned my mirrors with it, and it ispretty magical. The mirrors had all those streaky marks on them from last time they were cleaned, plus a few stray splotches off toothpaste etc. (How does toothpaste go so far, by the way?)

All I did was polish the mirrors with this cloth - dry. No sprays or even water, and they came up sparkly! I couldn't get a picture to show you - my camera wouldn't focus on the mirror, just the bathroom in the reflection - but it really worked a treat.

I also cleaned the shower screen and polished the metal frame around the screen. The soap scum came off with just the dry cloth and a bit of scrubbing, but you can use water too. I find microfiber cloths work best only just damp, not saturated.

And don't use chemicals with them - it damages them and they actually become less effective. If you want to clean with something else, like disinfectant etc, wipe the surface down using a different cloth after you've used the microfiber one.

This cloth can be chucked in the washing machine to clean it, just don't use fabric softener - same principle as your bath towels; softener makes them less absorbent.

In my quest for chemical free cleaning, a cloth like this is my best friend!

I'm sure you can find other brands of microfiber cloths that work, but this one is good quality. It's quite thick and sturdy feeling, and it definitely works better than some el cheapo ones I've tried.

If I bought this myself, it probably wasn't that expensive because I rarely buy expensive cleaning products. But if someone gave it to me, thats a different story.... Will you excuse me if I blame pregnancy brain on my poor memory at the moment?

Off to clean my glossy kitchen bench tops with my magic cloth!


Related Posts Plugin for WordPress, Blogger...